User Manual
The IHEPBox Web Interface
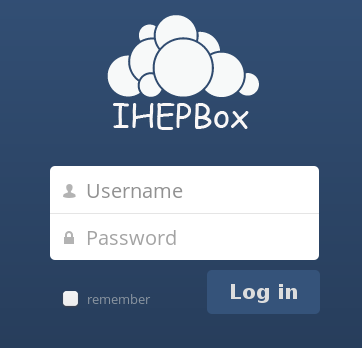
You can connect to IHEPBox server using any Web browser; just point it to https://ihepbox.ihep.ac.cn/ihepbox and enter your username and password.(User/password are the same as IHEP SSO)
Navigating the Main User Interface
By default, the IHEPBox Web interface opens to your Files page. Once you have accessed the IHEPBox Server main web interface you can add files, remove files, and make changes.
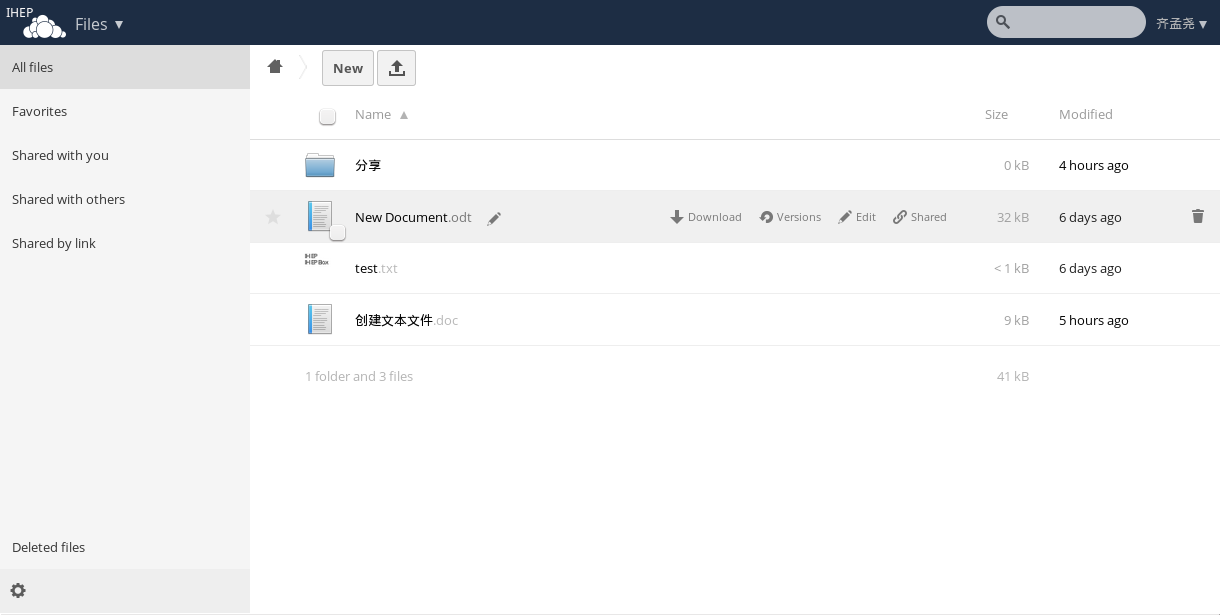
The IHEPBox Main User Interface contains the following fields and functions:
● Apps Selection Menu: Located in the upper left corner, click the arrow to open a dropdown menu to navigate to your various available apps.
● Apps Information field: Located in the left sidebar, this provides filters and tasks associated with your selected app. For example, when you are using the Files apps you have a special set of filters for quickly finding your files, such as files that have been shared with you, and files that you have shared with others. You’ll see different items for other apps.
● Application View: The main central field in the IHEPBox user interface. This field displays the contents or user features of your selected app.
● Navigation Bar: Located over the main viewing window (the Application View), this bar provides a type of breadcrumbs navigation that enables you to migrate to higher levels of the folder hierarchy up to the root level (home).
● New button: Located in the Navigation Bar, the New button enables you to create new files, new folders, or upload existing files from a specified link.
● Upload button: Located next to the New button in the Navigation Bar, the Upload button opens a file picker for uploading files from your system to the IHEPBox server.
● Search field: The Search field is in the upper right hand corner of your Web interface, for searching for files.
● Personal Settings menu: Click on your IHEPBox username, located to the right of the Search field, to open your Personal Settings dropdown menu. Your Personal page provides the following settings and features:
1.Links to download desktop apps
2.Re-run the First Run Wizard
3.Server usage and space availability
4.Password management
5.Name, email, and profile picture settings
6.Interface language settings
7.Manage notifications
8.SSL certificate manager
9.IHEPBox Version information
IHEPBox can display thumbnail previews for image files, MP3 covers, and text files, if this enabled by your server administrator. Hover your cursor over a file or folder to expose the controls for the following operations:
● Favorites: Click the star to the left of the file icon to mark it as a favorite.
● Pencil icon: Rename a file or folder. This does not alter the filename on the original document.
● Download: Download the file to your computer.
● Versions: Displays older versions, if there are any, and you can revert to an older file version.
● Edit: The Edit button appears on files that are editable inside IHEPBox, in the Documents app. Supported file formats are .odt, .doc, and .docx.
● Share: Share the file or folder with a group or other users, and create public shares with hyperlinks.
● Trash: Delete the selected file or folder, or unshare a shared file or folder.
Previewing Files:
You can display uncompressed text files, OpenDocument files, videos, and image files in the IHEPBox embedded viewers by clicking on the file name. There may be other file types you can preview if your IHEPBox administrator has enabled them. If IHEPBox cannot display a file, it starts a download process and downloads the file to your computer.
Video streaming by the native IHEPBox video player depends on your Web browser and the video format. If your IHEPBox administrator has enabled video streaming, and it doesn’t work in your Web browser, it may be a browser issue.
Navigating Inside Your IHEPBox
Navigating through folders in IHEPBox is as simple as clicking on a folder to open it and using the back button on your browser to move to a previous level. IHEPBox also provides a navigation bar at the top of the Files field for quick navigation.

● Navigation bar: The navigation bar functions as a “breadcrumb” locator. It displays your current directory and enables you to migrate back to one of the upper directories or, using the home icon, to navigate back into your root folder.
Overlay Icons Show Sharing Status
Any folder that has been shared is marked with the Shared overlay icon. Public link shares are marked with a chain link. Un-shared folders are blank.

If your IHEPBox server is the Enterprise Subscription, you may also have access to Sharepoint and Windows Network Drive file shares. These also have special overlay icons, and a red plugin means you have to enter a login to get access to the share.

Creating or Uploading Files and Directories
IHEPBox enables you to create new files or folders directly in an IHEPBox folder by clicking on the New button in the Files app.
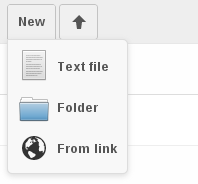
● New button options: The New button provides the following three options from which to choose:
● Text file: Creates a simple text file and adds the file to your current folder.
● Folder: Creates a new folder in the current folder.
● From link: Downloads a file from a URL that you type or copy into the form field, and places it into the current folder.
● Up arrow: The upward-point arrow is for uploading files from your computer into IHEPBox. You can also upload files by dragging and dropping them from your file manager.
Selecting Files or Folders
You can select one or more files or folders by clicking on the small thumbnails or icons that represent them. When you select a file or folder, a small checkbox is populated with a check to indicate that it is selected. To select all files in the current directory, you can click on the checkbox located at the top of the Files app field, above the first file or folder on the list.
If you select multiple files, you can delete all of the selected files or download them as a ZIP file by using the Delete or Download buttons at the top right side of the Files app field.
Filtering the File Application View
IHEPBox enables you to view files in the File Application View using filter options located in the Apps Information Field. This feature enables you to quickly and easily view and manage files based on their share status.
You can click on any of the filter options to view the files as follows:
● All files: The default view; displays all files that you have access to.
● Favorites: Files or folders marked with the yellow star.
● Shared with you: Displays all files shared with you by another user or group.
● Shared with others: Displays all files that you have shared with other users or groups.
● Shared by link: Displays all files that are shared by you via public link.
● External Storage: Files that you have access to on external storage devices and services such as Dropbox, Google, and Amazon S3.
Moving Files
Using the IHEPBox web interface, you can move files and folders by dragging and dropping them into any directory.
Sharing Files Locally
When enabled by your administrator, you can share files or folders on IHEPBox with a local user, group, or any person online with a public link. Shared files and folders are labeled with the triangular share icon, and the status Shared in the file or folder row.
To create a local share with other users or groups on your IHEPBox server:
1.Hover your cursor over an item on the Files page
2.Click the Share icon
The Share dialog box opens to show the following options:
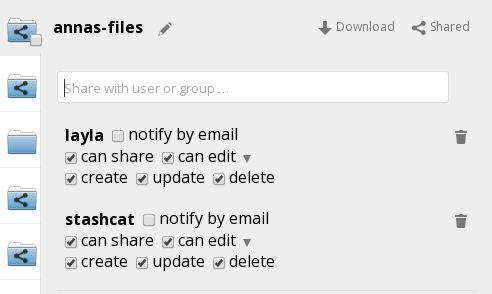
● Share dialog box: Type the name of the user or group that you want to share with. If you want to share with more than one, you have to create each share separately. Check the permissions you want the user or group to have, and optionally send them an email notification.
Your new share appears on user’s Files pages marked with a Share icon, and the name of the file owner.

● Shared file: When you want to revoke a share, simply click the Trashcan icon next to the name of the appropriate user or group in the Shared dialog.
Creating a Public Link Share
You can share files outside of your organization with people who are not users on your IHEPBox server by creating a public share link. Open the Share dialog and check Share Link.
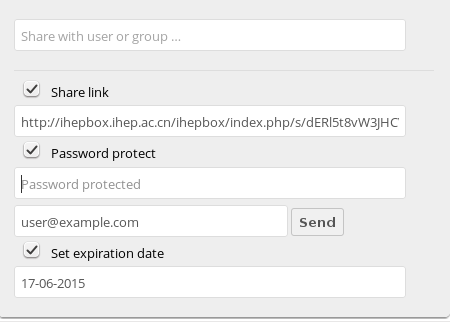
● Public share box: This creates a public URL that anyone can use to access the share. You have the options to send an email notification, protect it with a password, and put an expiration date on it. Your IHEPBox administrator has the option to require passwords and expiration dates.
Change in Share Expiration Date
Now you can set an expiration date only on public shares, and local shares do not expire when public shares expire. The only way to “expire” a local share is to click the trash can icon to un-share your files.
Version Control
IHEPBox supports simple version control system for files. Versioning creates backups of files which are accessible via the Versions link. This link contains the history of the file where you can roll back a file to any previous version. Changes made at intervals greater than two minutes are saved in data/[user]/versions.
To restore a specific version of a file, hover your cursor over a file and click the Versions link. If any version is available, you should see a list like the image below:

Clicking on Restore next to any version will revert the file to that version back.
The versioning app expires old versions automatically to make sure that the user doesn’t run out of space. This pattern is used to delete old versions:
● For the first second we keep one version
● For the first 10 seconds IHEPBox keeps one version every 2 seconds
● For the first minute IHEPBox keeps one version every 10 seconds
● For the first hour IHEPBox keeps one version every minute
● For the first 24 hours IHEPBox keeps one version every hour
● For the first 30 days IHEPBox keeps one version every day
● After the first 30 days IHEPBox keeps one version every week
The versions are adjusted along this pattern every time a new version gets created.
The version app never uses more that 50% of the user’s currently available free space. If the stored versions exceed this limit, IHEPBox deletes the oldest versions until it meets the disk space limit again.
Installing the Mac OS X Desktop Synchronization Client
You can download the IHEPBox Desktop Synchronization Client from the IHEPBox Website. There are clients for Mac OS X, and Microsoft Windows.
Installation on Mac OS X and Windows is the same as for any software application: download the program and then double-click it to launch the installation, and then follow the installation wizard. After it is installed and configured the sync client will automatically keep itself updated.
Using the Synchronization Client
The IHEPBox Desktop Client remains in the background and is visible as an icon in the system tray (Windows, KDE), status bar (Mac OS X), or notification area (Linux).

The status indicator uses overlay icons to indicate the current status of your synchronization. The green circle with the white checkmark tells you that your synchronization is current and you are connected to your IHEPBox server.

The blue icon with the white semi-circles means synchronization is in progress.

The yellow overlay icon with the parallel lines tells you your synchronization has been paused. (Most likely by you, by opening the client and clicking Account > Pause.)

The gray icon with three white dots means your sync client has lost its connection with your IHEPBox server.

When you see a white circle with the letter “i” that is the informational icon, so you should click it to see what it has to tell you.

The red circle with the white “x” indicates a configuration error, such as an incorrect login or server URL.
Using the Desktop Client Menu
A right-click on the icon opens the following menu:
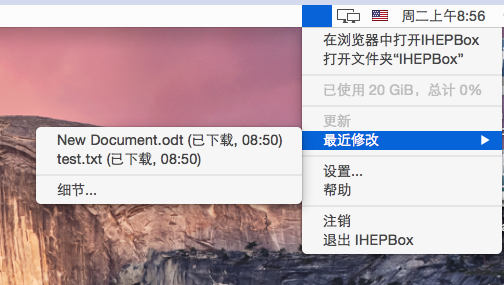
The Desktop Client menu provides the following options:
● Open IHEPBox in browser: Launches the IHEPBox Web interface.
● Open folder 'IHEPBox': Opens your local IHEPBox folder. If you have defined multiple synchronization targets, the window displays each local folder.
● Disk space indicator: Indicates the amount of space currently used on the server.
● Operation indicator: Displays the status of the current synchronization process or indicates Up to date if the server and client are in sync.
● Recent Changes: Displays the last six files modified, and shows the current synchronization status listing all changes since the last restart of the IHEPBox client.
● Settings...: The settings menu.
● Help: Opens a browser to display IHEPBox Desktop Client Guide.
● Sign out: Stops synchronization.
● Quit IHEPBox: Quits the IHEPBox Client, ending any currently running synchronizations.
Using the Account Settings Window
The Account window provides a summary for your IHEPBox account settings. You can manage which folders and files you want to synchronize, change your account settings, and pause and resume synchronization.
To access and modify the account settings:
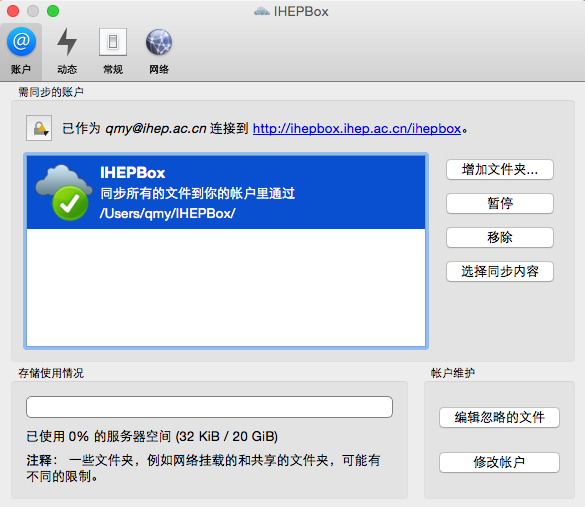
The fields and options in this window include:
● Connected to
● Add Folder... button: Add another folder to the synchronization process (see Adding a Folder).
● Pause/Resume button: Pauses the current sync (or prevents the client from starting a new sync), or resumes the sync process.
● Remove button: Removes the selected folder from the sync process. This button is used when you want to synchronize only a few folders and not the root folder.
● Storage Usage field: Displays how much space your files are using on the IHEPBox server.
● Edit Ignored Files button: Launches the Ignored Files Editor.
● Modify Account button: Use this to change your IHEPBox server settings by launching the account setup wizard (see accountsetup).
● Modify Account button: Use this to change your IHEPBox server settings by launching the account setup wizard (see accountsetup).
Adding a Folder
The Add Folder ... button enables you to add a new local folder to the synchronization process.
To add a new folder:
1.Click the Add a Folder ... button in the Account window.
The Add Folder... window opens
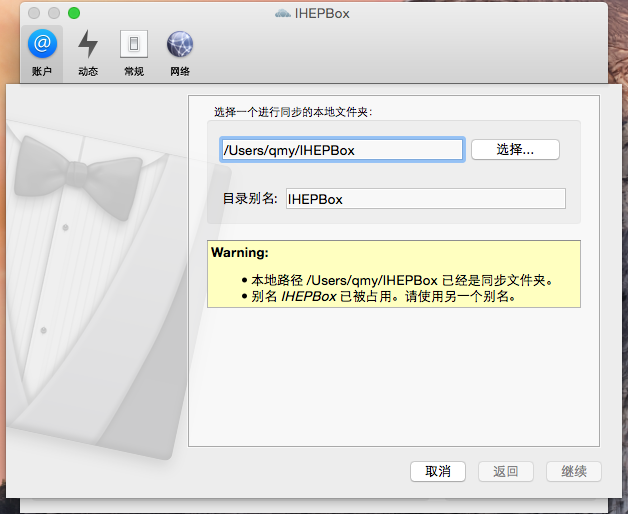
2.Type a unique path and alias name to the folder, or use the Choose... button to open a graphical file picker.
3.Click ‘Next’ to continue.
A window opens prompting you to select a remote destination folder on the IHEPBox server to synchronize.
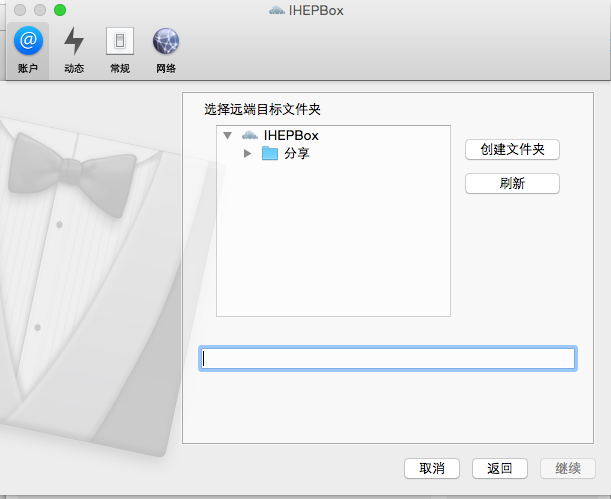
Select a folder on the IHEPBox server to which you want to synchronize your newly added local folder.
Editing Ignored Files
The Ignored Files Editor provides a list of files that are ignored (that is, not synchronized) by the client and server during synchronizations. You may add additional files or directories that you want to exclude from the synchronization process. In addition to using standard characters, the Ignored Files Editor enables you to use wild cards (for example, using an asterisk ‘*’ to indicate multiple characters or a question mark ‘?’ to indicate a single character).
You might have some local files or directories that you do not want to backup and store on the server. To identify and exclude these files or directories, you can use the Ignored Files Editor.
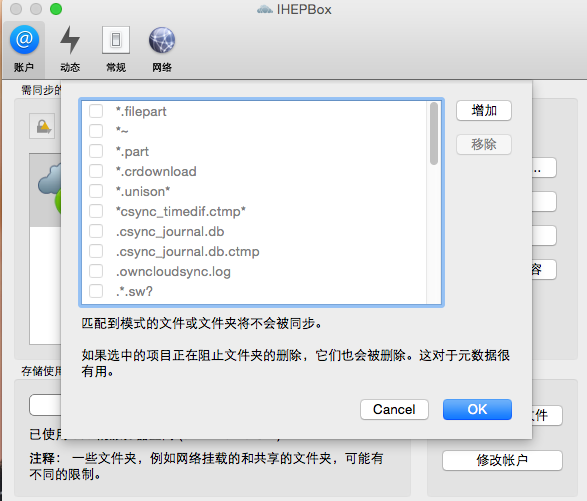
For your convenience, the editor is pre-populated with a default list of typical ignore patterns. These patterns are contained in a system file (typically sync-exclude.lst) located in the IHEPBox Client application directory. You cannot modify these pre-populated patterns directly from the editor. However, if necessary, you can hover over any pattern in the list to show the path and filename associated with that pattern, locate the file, and edit the sync-exclude.lst file.
Each line in the editor contains an ignore pattern string. When creating custom patterns, in addition to being able to use normal characters to define an ignore pattern, you can use wildcards characters for matching values. As an example, you can use an asterisk (*) to identify an arbitrary number of characters or a question mark (?) to identify a single character.
Patterns that end with a slash character (/) are applied to only directory components of the path being checked.
Each pattern string in the list is preceded by a checkbox. When the check box contains a check mark, in addition to ignoring the file or directory component matched by the pattern, any matched files are also deemed “fleeting metadata” and removed by the client.
In addition to excluding files and directories that use patterns defined in this list:
● The IHEPBox Client always excludes files containing characters that cannot be synchronized to other file systems.
● Files are removed that cause individual errors three times during a synchronization. However, the client provides the option of retrying a synchronization three additional times on files that produce errors.
Using the Activity Settings Window
The Activity window provides an in-depth account of recent synchronization activity. It shows files that have not been synchronized because they are on the ignored files list, or because they cannot be synced due to containing special characters that cannot be stored on certain file systems.
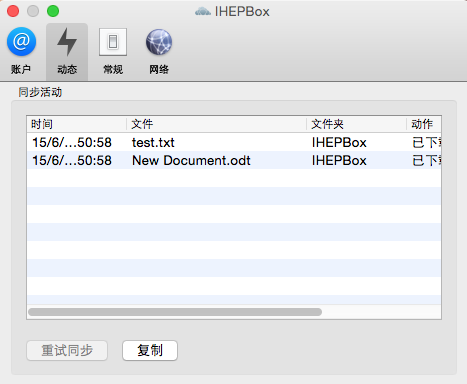
You can open the Activity window in one of the following ways:
● Click ‘Activity’ in the left frame of the IHEPBox Settings window.
● Invoke the window from the IHEPBox Desktop Client menu by selecting Recent Changes > Details.... (See Using the Desktop Client Menu.)
Using the General Settings Window
The General settings window has options for launching the client at system startup, notifications, and using monochrome icons.

● Launch on System Startup checkbox: Provides the option to check (enable) or uncheck (disable) whether the IHEPBox Desktop Client launches at system startup. By default, this option is enabled (checked) after you have configured your account.
● Show Desktop Nofications checkbox: Provides the option to check (enable) or uncheck (disable) notifications about sync activity.
● Use Monochrome Icons checkbox: Provides the option to check (enable) or uncheck (disable) the use of monochrome (visually less obtrusive) icons.
● About field: Provides information about the software authors along with pertinent build conditions.
● Updates field: Notifies you of any available updates for the IHEPBox Desktop Client.
Installing the Windows Desktop Synchronization Client
You can download the IHEPBox Desktop Synchronization Client from the IHEPBox Website. There are clients for Mac OS X, and Microsoft Windows.
Installation on Mac OS X and Windows is the same as for any software application: download the program and then double-click it to launch the installation, and then follow the installation wizard. After it is installed and configured the sync client will automatically keep itself updated.
Using the Synchronization Client
The IHEPBox Desktop Client remains in the background and is visible as an icon in the system tray (Windows, KDE), status bar (Mac OS X), or notification area (Linux).

The status indicator uses overlay icons to indicate the current status of your synchronization. The green circle with the white checkmark tells you that your synchronization is current and you are connected to your IHEPBox server.

The blue icon with the white semi-circles means synchronization is in progress.

The yellow overlay icon with the parallel lines tells you your synchronization has been paused. (Most likely by you, by opening the client and clicking Account > Pause.)

The gray icon with three white dots means your sync client has lost its connection with your IHEPBox server.

When you see a white circle with the letter “i” that is the informational icon, so you should click it to see what it has to tell you.

The red circle with the white “x” indicates a configuration error, such as an incorrect login or server URL.
Using the Desktop Client Menu
A right-click on the icon opens the following menu:
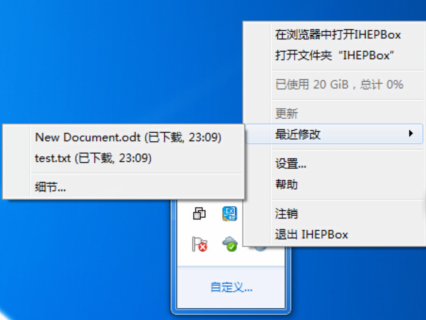
The Desktop Client menu provides the following options:
● Open IHEPBox in browser: Launches the IHEPBox Web interface.
● Open folder 'IHEPBox': Opens your local IHEPBox folder. If you have defined multiple synchronization targets, the window displays each local folder.
● Disk space indicator: Indicates the amount of space currently used on the server.
● Operation indicator: Displays the status of the current synchronization process or indicates Up to date if the server and client are in sync.
● Recent Changes: Displays the last six files modified, and shows the current synchronization status listing all changes since the last restart of the IHEPBox client.
● Settings...: The settings menu.
● Help: Opens a browser to display IHEPBox Desktop Client Guide.
● Sign out: Stops synchronization.
● Quit IHEPBox: Quits the IHEPBox Client, ending any currently running synchronizations.
Using the Account Settings Window
The Account window provides a summary for your IHEPBox account settings. You can manage which folders and files you want to synchronize, change your account settings, and pause and resume synchronization.
To access and modify the account settings:
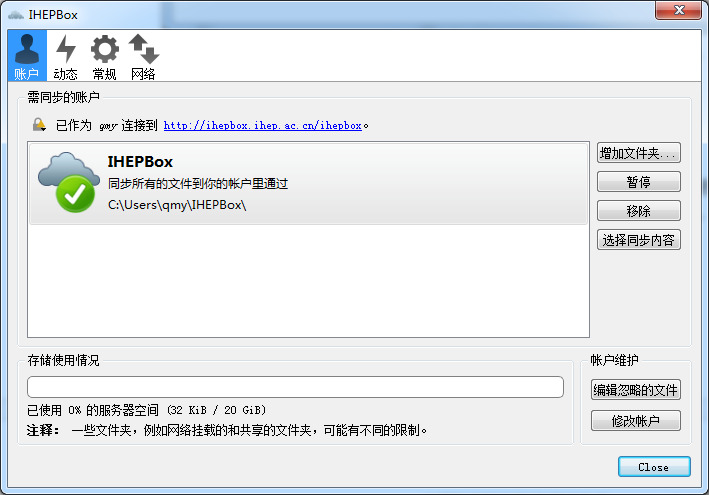
The fields and options in this window include:
● Connected to
● Add Folder... button: Add another folder to the synchronization process (see Adding a Folder).
● Pause/Resume button: Pauses the current sync (or prevents the client from starting a new sync), or resumes the sync process.
● Remove button: Removes the selected folder from the sync process. This button is used when you want to synchronize only a few folders and not the root folder.
● Storage Usage field: Displays how much space your files are using on the IHEPBox server.
● Edit Ignored Files button: Launches the Ignored Files Editor.
● Modify Account button: Use this to change your IHEPBox server settings by launching the account setup wizard (see accountsetup).
● Modify Account button: Use this to change your IHEPBox server settings by launching the account setup wizard (see accountsetup).
Adding a Folder
The Add Folder ... button enables you to add a new local folder to the synchronization process.
To add a new folder:
1.Click the Add a Folder ... button in the Account window.
The Add Folder... window opens
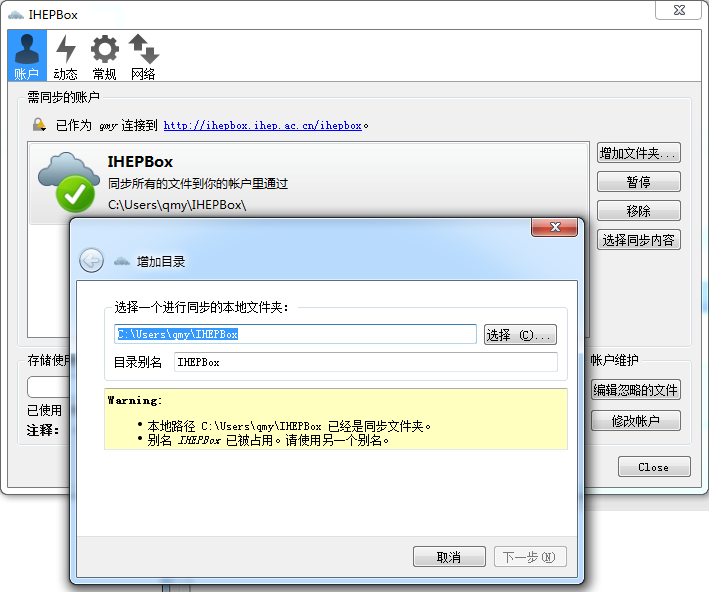
2.Type a unique path and alias name to the folder, or use the Choose... button to open a graphical file picker.
3.Click ‘Next’ to continue.
A window opens prompting you to select a remote destination folder on the IHEPBox server to synchronize.
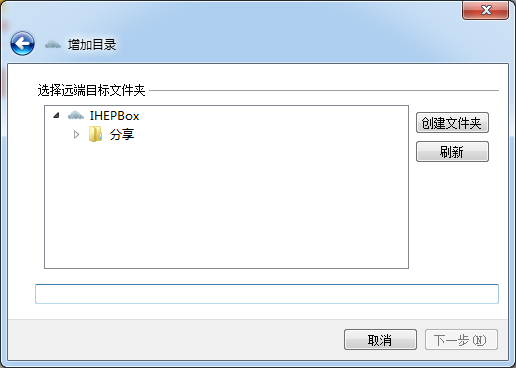
Select a folder on the IHEPBox server to which you want to synchronize your newly added local folder.
Editing Ignored Files
The Ignored Files Editor provides a list of files that are ignored (that is, not synchronized) by the client and server during synchronizations. You may add additional files or directories that you want to exclude from the synchronization process. In addition to using standard characters, the Ignored Files Editor enables you to use wild cards (for example, using an asterisk ‘*’ to indicate multiple characters or a question mark ‘?’ to indicate a single character).
You might have some local files or directories that you do not want to backup and store on the server. To identify and exclude these files or directories, you can use the Ignored Files Editor.
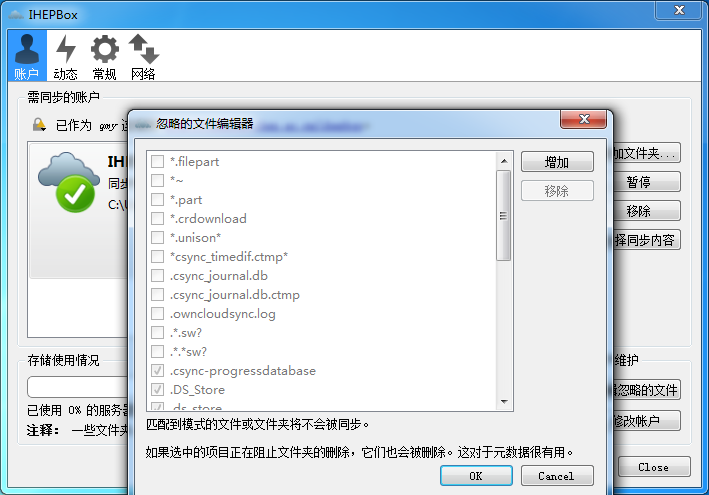
For your convenience, the editor is pre-populated with a default list of typical ignore patterns. These patterns are contained in a system file (typically sync-exclude.lst) located in the IHEPBox Client application directory. You cannot modify these pre-populated patterns directly from the editor. However, if necessary, you can hover over any pattern in the list to show the path and filename associated with that pattern, locate the file, and edit the sync-exclude.lst file.
Each line in the editor contains an ignore pattern string. When creating custom patterns, in addition to being able to use normal characters to define an ignore pattern, you can use wildcards characters for matching values. As an example, you can use an asterisk (*) to identify an arbitrary number of characters or a question mark (?) to identify a single character.
Patterns that end with a slash character (/) are applied to only directory components of the path being checked.
Each pattern string in the list is preceded by a checkbox. When the check box contains a check mark, in addition to ignoring the file or directory component matched by the pattern, any matched files are also deemed “fleeting metadata” and removed by the client.
In addition to excluding files and directories that use patterns defined in this list:
● The IHEPBox Client always excludes files containing characters that cannot be synchronized to other file systems.
● Files are removed that cause individual errors three times during a synchronization. However, the client provides the option of retrying a synchronization three additional times on files that produce errors.
Using the Activity Settings Window
The Activity window provides an in-depth account of recent synchronization activity. It shows files that have not been synchronized because they are on the ignored files list, or because they cannot be synced due to containing special characters that cannot be stored on certain file systems.
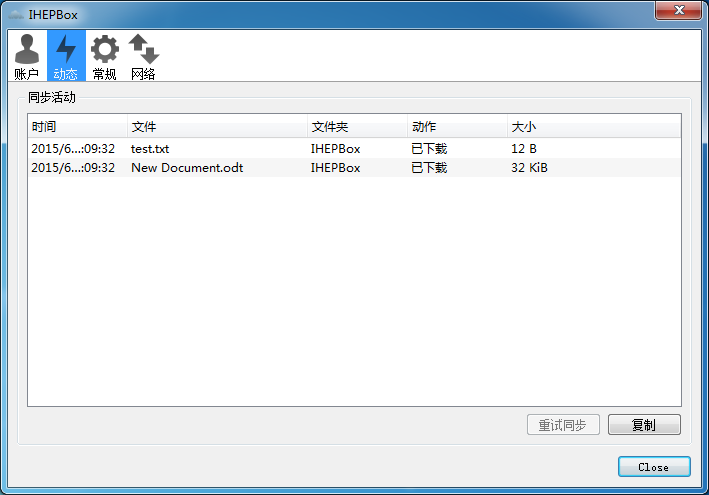
You can open the Activity window in one of the following ways:
● Click ‘Activity’ in the left frame of the IHEPBox Settings window.
● Invoke the window from the IHEPBox Desktop Client menu by selecting Recent Changes > Details.... (See Using the Desktop Client Menu.)
Using the General Settings Window
The General settings window has options for launching the client at system startup, notifications, and using monochrome icons.

● Launch on System Startup checkbox: Provides the option to check (enable) or uncheck (disable) whether the IHEPBox Desktop Client launches at system startup. By default, this option is enabled (checked) after you have configured your account.
● Show Desktop Nofications checkbox: Provides the option to check (enable) or uncheck (disable) notifications about sync activity.
● Use Monochrome Icons checkbox: Provides the option to check (enable) or uncheck (disable) the use of monochrome (visually less obtrusive) icons.
● About field: Provides information about the software authors along with pertinent build conditions.
● Updates field: Notifies you of any available updates for the IHEPBox Desktop Client.
Copyright 2015 © Computing Center,Institute of High Energy Physics | Email:helpdesk@ihep.ac.cn
